How to restore the bootloader
Authors: OrkoMastro e matteoberg
The procedure below has been tested by multiple users, but we decline every reponsibility for any damage to the printer hardware or software
If the wrong firmware is flashed on the printer, it can happen to see the update process getting stuck on the Font table updating 100% screen, then, when rebooting the printer, the Booting... screen will appear
In this case, it is necessary to upload a new bootloader on the motherboard
Don't panic: it can be fixed, you just need a bit of patience and a couple of extra tools
There's already an ongoing discussion on a github issue, in case you want to join that conversation or you need more details or clarifications
Materials
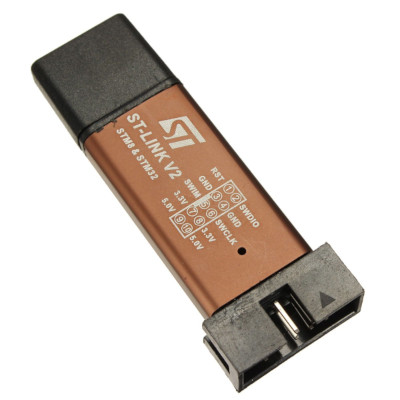
- Youmile Youmile ST-LINK V2 programmer to buy from Amazon, or wherever you prefer
- STM32 Cube Programmer, compatible with Windows 32bit, Windows 64 bit, Mac OSx and Linux
- File per il Bootloader
STM32 Cube Programmer might not work on very old Windows systems
In this case, continue to the next page, where you can find a full guide for an alternative solution
Prepare bootloader and firmware
Once you've downloaded the bootloader archive, extract the Robin_nano35_v13_f4_boot_210615.hex file from the path /MKS-Robin_Nano-V1.X-master/Bootloader/ and save it on your Desktop, to make the next steps easier
Then, extract the Mks_Nano35_V2.0.3.6 Release file.rar from the path /MKS-Robin-Nano-V1.X-master/Nano firmware v2.x.x/ and extract the folder English in the path /Mks_Nano35_V2.0.3.6 Release file, still saving it on the Desktop to make things easier. This folder contains the MKS firmware, which is the base to then install the Flyingbear firmware
Before proceeding, make sure the print head is in the homing position and the plate is a few centimeters away from the print head!!!
Connections
Before connecting the ST-LINK (the USB programmer previously mentioned) to the PC, you should first switch off the printer using the switch on the back of the printer, making sure, though, that the power cable is still connected to the power socket
After that, we can remove the bottom panel of the printer, flipping it on its left side, to make all the electronics accessible, by removing the six screws from the panel
To make your life easier, you can unscrew the two screws holding the cooling fan of the motherboard and remove it, to have more space for the next steps
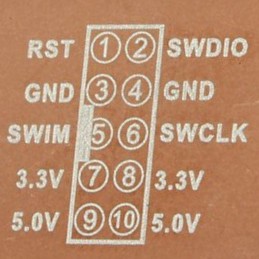
To connect the motherboard to the ST-LINK, you can follow the writigns on the front of the USB programmer
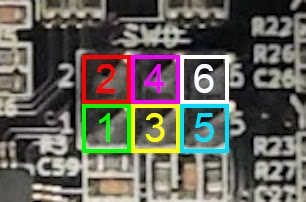
The pins to connect on the motherboard are the ones in the image below
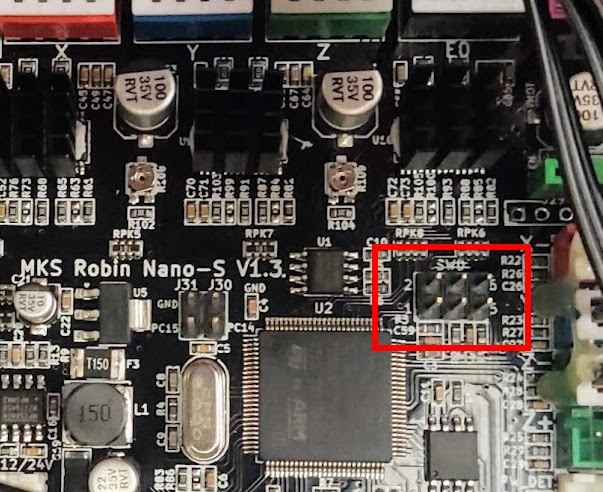
For the sake of simplicity, below you can find the corresponding connections
| Pin ST_LINK | Pin Motherboard |
|---|---|
| SWCLK | 3 |
| SWDIO | 1 |
| GND | 6 |
| 3.3v | 2 |
Make sure the cables are firmly connected to the motherboard pins and that they're wired correctly
Connect the ST-LINK to a PC USB port. If all connections are correct, the screen and the motherboard should light up
How to flash the bootloader with STM32 Cube Programmer
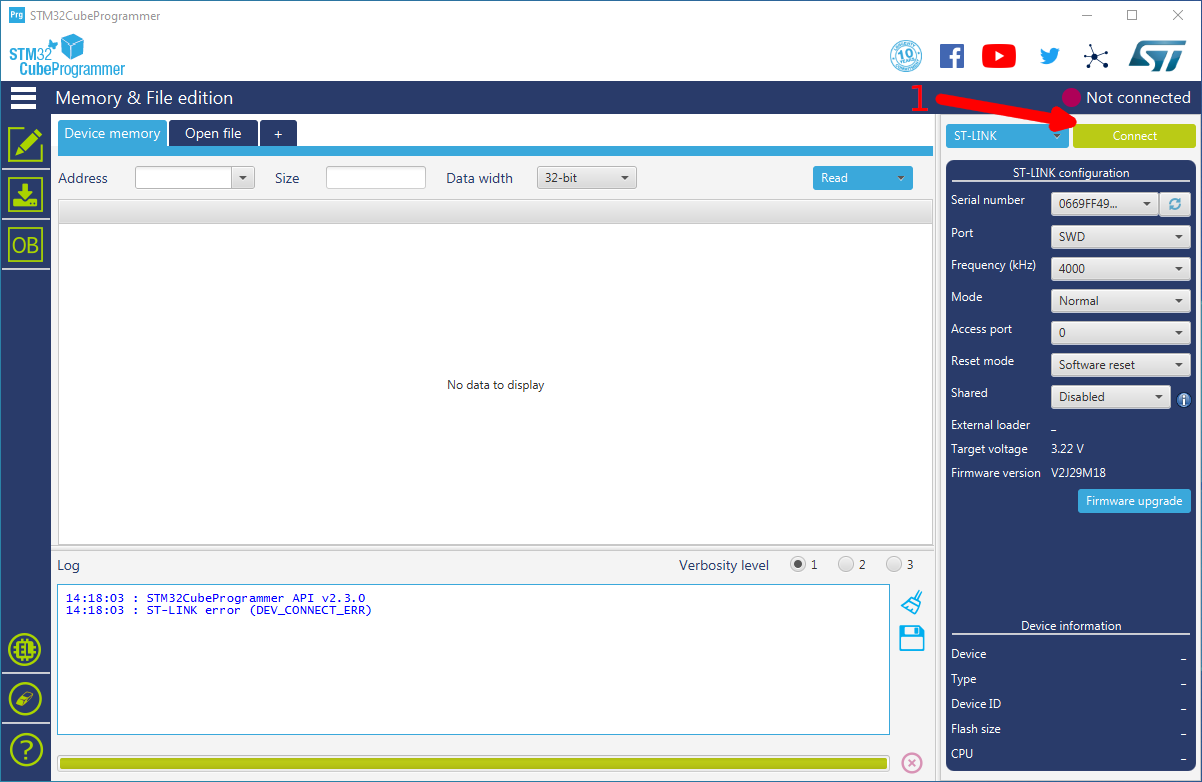
Open the STM32CubeProgrammer application you previously downloaded, then follow the next steps
- Click on the Connect button
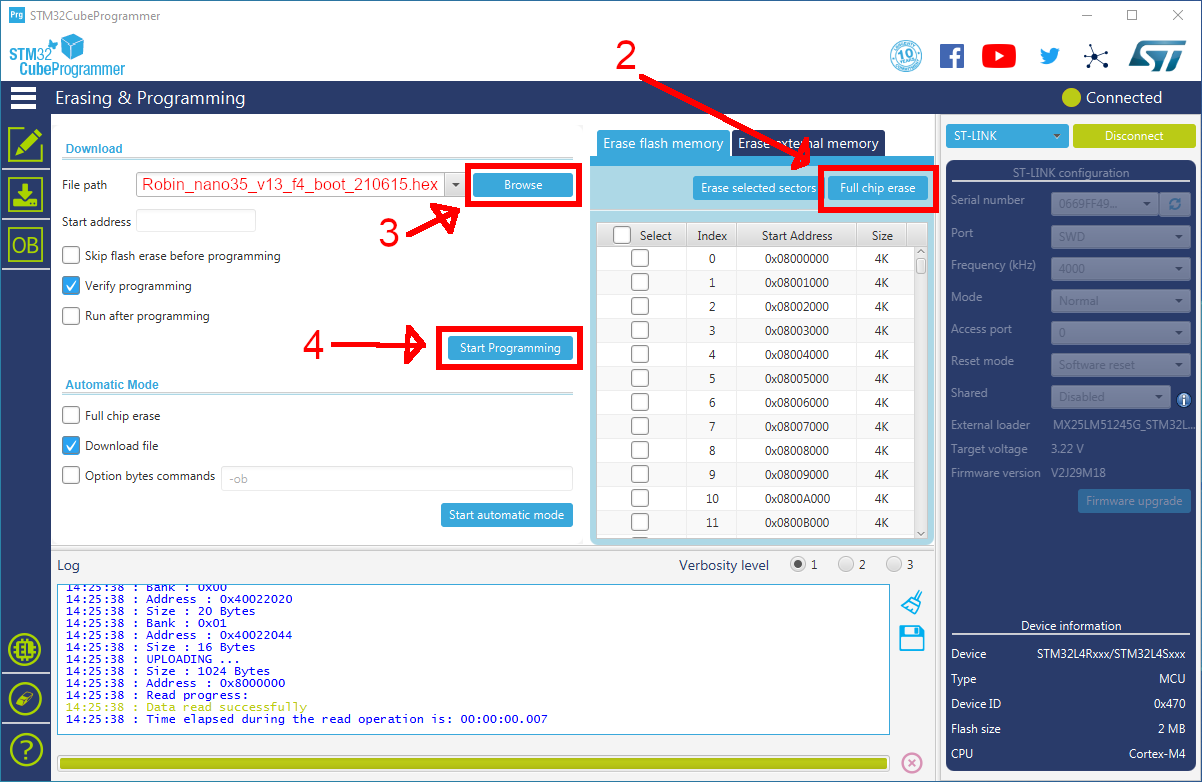
- Click on the Full chip erase button
- Click on Browse, then select the Robin_nano35_v13_f4_boot_210615.hex file that you previously saved
- Click on the Start Programming button, then wait for the process to complete

- Once completed the bootloader flash procedure, you can disconnec the ST-LINK from the USB port and the cables from the motherboard; after this, motherboard and screen should both turn off

Final steps
before continuing, you can put back the cooling fan and the bottom panel, then bring back the printer to the original position
Before flashing a new firmware, insert an SD card in the PC, then format it as FAT32
Once formatted, copy the whole content of the English folder previously saved on the Desktop
For the sake of clarity, these are the files/folders you should be copying on to the SD card
- mks_font folder
- mks_pic folder
- MksWifi.bin file
- robin_nano35_cfg.txt file
- Robin_nano35.bin file
Once you've copied all the files on the SD Card, remove it safely from your computer and insert in the 3d printer, then turn it on again (don't foget to switch the power button on!!!)
Once printer starts, the flashing procedure should start
In case the firmware flashing procedure should hang up and get stuck on Updating 100%, wait for about ten minutes, then turn the printer off using the power button at the back, extract the SD card and turn it on again
If the procedure went well, you should see on your screen the Makerbase logo: it means you've installed the Custom MKS Firmware you were longing for!!!
At this point, you can install any other firmware compatible with your motherboard
If you have any question, please do not hesitate to contact us on Discord: matteoberg#3262 e OrkoMastro#0507